At times, we, the Android lovers feel the requirement of a complete Back-up of all Data on our Gadget; may it be because some of us love to try different updates and custom ROMs or MODs or rather it is better to be cautious of the valuable Data stored that might be accidentally wiped out because, the phone might get into water by-chance or might slip-off the hands and become wrecked. Whatever the reason is, a good Back-up technique is worth discussing. Today I'll share some of the sophisticated procedures of making a good backup of your Android Phone Data.
Techniques for Rooted Gadgets
- Nandroid Backup
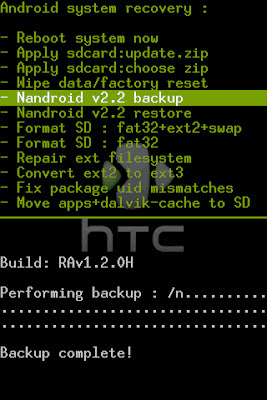
Usually if you root your gadget, most likely you do have a custom Recovery option. Most of the custom recovery options provide good backup as-well. However, the most popular custom recovery is ClockWorkMod Recovery. Using ClockWorkMod recovery it is very easy to make a backup of all your Data to the SD card inserted in the device.
All you need is to boot into Recovery Mode and create a Nandroid backup (usually through the "menu Backup and restore --> Backup").
You can also copy the entire Nandroid backup to your computer. It ensures added security because you might accidentally delete the Nandroid backup folder from the SD card.
If you want to restore from that backup you made at some point later, just copy the Nandroid folder back onto your SD Card, boot into Recovery Mode and select "Backup and restore --> Restore".
- Titanium Backup
Another powerful backup option is to use Titanium Backup App. Titanium Backup gives you direct access to your system.
Once you have launched the app, click on the "Backup/Restore" tab and click the Menu button on your phone. From the menu that appears, select "Batch". At the next menu, click RUN Backup all user apps + system data. You can choose to backup just your user apps and system data but you can choose a complete and total backup of your phone.
Depending upon your volume of data, the back-up procedure can take from a few minutes to half an hour or even more.
It is recommended that you copy the back-up to your PC. In the SD card /Titanium backup directory you can find your backup.
To restore your backup, you can just select "Menu --> Batch". On the "Backup/Restore" menu, scroll down to find restore options.
Titanium Backup can be downloaded free from Google Play Store using This Link.
Techniques for not rooted Gadgets
- MyBackup Pro
This app not only works on rooted gadgets but also un-rooted gadgets.
MyBackup Pro gives you option to make backup of either your Data or the Apps. Once you have launched the App, from Backup option you will get to select between the two.
In case you've selected Backup your Apps, you will have the flexibility to select some or all of the Apps.
If you’ve selected data, you can choose to backup your data to either your SD card or to an online server. Just like in the Apps menu, you have the option of selecting certain data you’d like to save or all of them. Your data will be compressed into a ZIP file on your SD card.
You can always play safer by copying the backup zip file to your PC.
MyBackup Pro also have the feature of scheduling which takes backup of your Data in a timely manner.
For restoring your data, simply choose the option Restore from the menu.
MyBackup Pro can be purchased from Google Play Store using This Link. You can also have a taste of this App using 30 day Trial Version.
Techniques to make a Cloud-Backup
So far we have discussed about making a backup and storing it locally. But storing important backup locally might not come handy when you are away. Instead if you store your back-up, contacts or important Data in the Cloud network, then you can access your Data from anywhere round the globe. Is n’t that cool? That makes you independent of any hardware or device to contain your important information/Data. You just need to connect to the internet from somewhere and you can get your Data anytime.
There are several Cloud Networks to store your back-up. Here I’ll mention only the excellent Cloud Servers that syncs your Data easily.
Back-up Data using Google Account
Android, being a Google Product itself lets you easily backup your contacts, system settings, apps, calendar, emails on your Google account. Simply go to Settings --> Privacy on your phone. Check the boxes for “Back up my settings” and “Automatic restore.” Make sure that under Backup account you specify the Google account that you want to backup data for.
Now go to Settings --> Account & Sync, tap on the Google account you want to sync, and check all the available options. This way, your data will be stored in your easy-to-access Google account.
Google Drive
Google Drive is Google’s cloud service that offers free cloud storage. Google Drive is available for: PC and Mac, Chrome OS, iPhone and iPad (coming soon), Android devices.
Google Drive is available in Google Play Store for your Android Gadgets. Head over to https://drive.google.com/ to get started.
Get started with 5 GB of free space. Upgrade to 25 GB for less than $2.50 a month, and you can store practically everything for next to nothing.
Photo & Video Back-up
Android v2.2 and higher supports Google’s Instant Upload service. You can enable this service through Menu > Settings.
This service uploads your photos and videos that you click or shoot automatically. These are uploaded t your Google + private album and most importantly, they are only visible to you until you decide to share them with friends.
You can also use Picasa Tool, Flickr Companion, PhotoBucket Mobile to store your photos. But these are not automatic service. You need to manually upload your content; also you must have corresponding account to use their service.
SMS Backup+
SMS Backup+ is a cool app that can store your important SMS, MMS, Call Logs. This app sends all your SMS threads to Gmail and stores them under label SMS. When you require to restore, SMS Backup+ allows you to restore your SMS and Call Log entries right into your Android Gadget. MMS cannot be restored though. You can download SMS Backup + from the Google Play Store for free.
Backup Data on Box Cloud server
Box offers a cool app for your Android gadget to sync your Data to their cloud network. But first you need to have an account in Box.net. You can get upto 50Gb of free cloud storage. Read this article to understand how to set up Box.net.
Backup Data on Dropbox Cloud server

Dropbox is similar Cloud service to that of Box.net. They offer 5 GB of free cloud storage. Also Dropbox offers handy apps for your Android device as well as your PC. Read this article to have a clear idea.
Sandisk Memory Zone
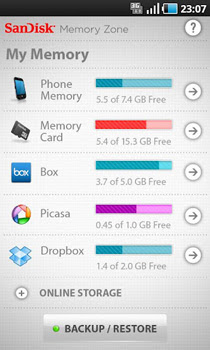
This is a cool app that allows you to backup files and apps from your phone’s SD card to a cloud storage provider (Box, Dropbox, Google Docs, Picasa, SugarSync, and Facebook ).
Once you’ve installed this app, it’ll scan your SD card and your device’s internal memory the first time you run it. You’ll be able to choose a cloud storage provider where you’d like to backup your data. Sandisk Memory Zone will prompt you for the frequency schedule of your backup, whether you’d like it to be backed up “only this time” or “everyday.”
Sandisk Memory Zone can be downloaded free from the Google Play Store.
inDefend Mobile Backup
With inDefend Mobile backup you can easily sync your contacts, call logs, text messages your calendar, personalized settings to the Cloud Network provided by inDefend. But you should have an account on inDefend.
You may also chose certain data to restore within a backup package. The inDefend Mobile Backup also has the flexibility to schedule your backups, automatic storing of your mobile data in the cloud. You can also enable or disable the auto-backup feature. You can set the frequency for making backups automatically, in days, week, or months. You can also enable or disable sending of notification alerts to your email under the Settings tab.
Once the App is running, you need to log into your account, then you will be directed to the app’s home screen. Here you can check the boxes of the contents you want to backup.
After you have made your choices, press the Go button at the bottom of the screen to begin encrypting your data. The app keeps you updated with the uploading progress via the phone’s notification menu. You will also need to label your backup package. The app allows you to upload 10 different backup packages.Under the Backups tab, inDefend Mobile Backup will let you see all your backup packages.
To restore a specific mobile content from within a package, choose the backup package and select the specific data you want to restore on your phone. The app will then download and decrypt it, and restore the data on your Android device.
You can download inDefend Mobile Backup for free from the Google Play Store.
Manual Backup – Drag & Drop
You are the Boss of your Android Gadget and you can always connect your device to your computer and access your device’s SD card. You can copy, drag & drop your content to a folder on your PC and save it.
If you are systematic and organised, Manual Backup is the safest in my point of view. But there’s always an advantage using the automatic schedulers offered by the Android Apps that we discussed so far. I guess after reading this article you would be a lot more cautious about your important Data. Also this guide might come handy to save some memory space on your Gadget, is n’t it?


0 comments:
Post a Comment